Warp UI tutorial
Follow this tutorial to learn how to make a Job using the Warp App. To use the SDK, follow the SDK tutorial. To learn more about how Warp works, read the overview.
- Download Google Chrome
- Install the Station Chrome Extension
Set up a funding account
-
Click the wallet icon in the bottom left corner and then click Station to connect your station browser extension.
-
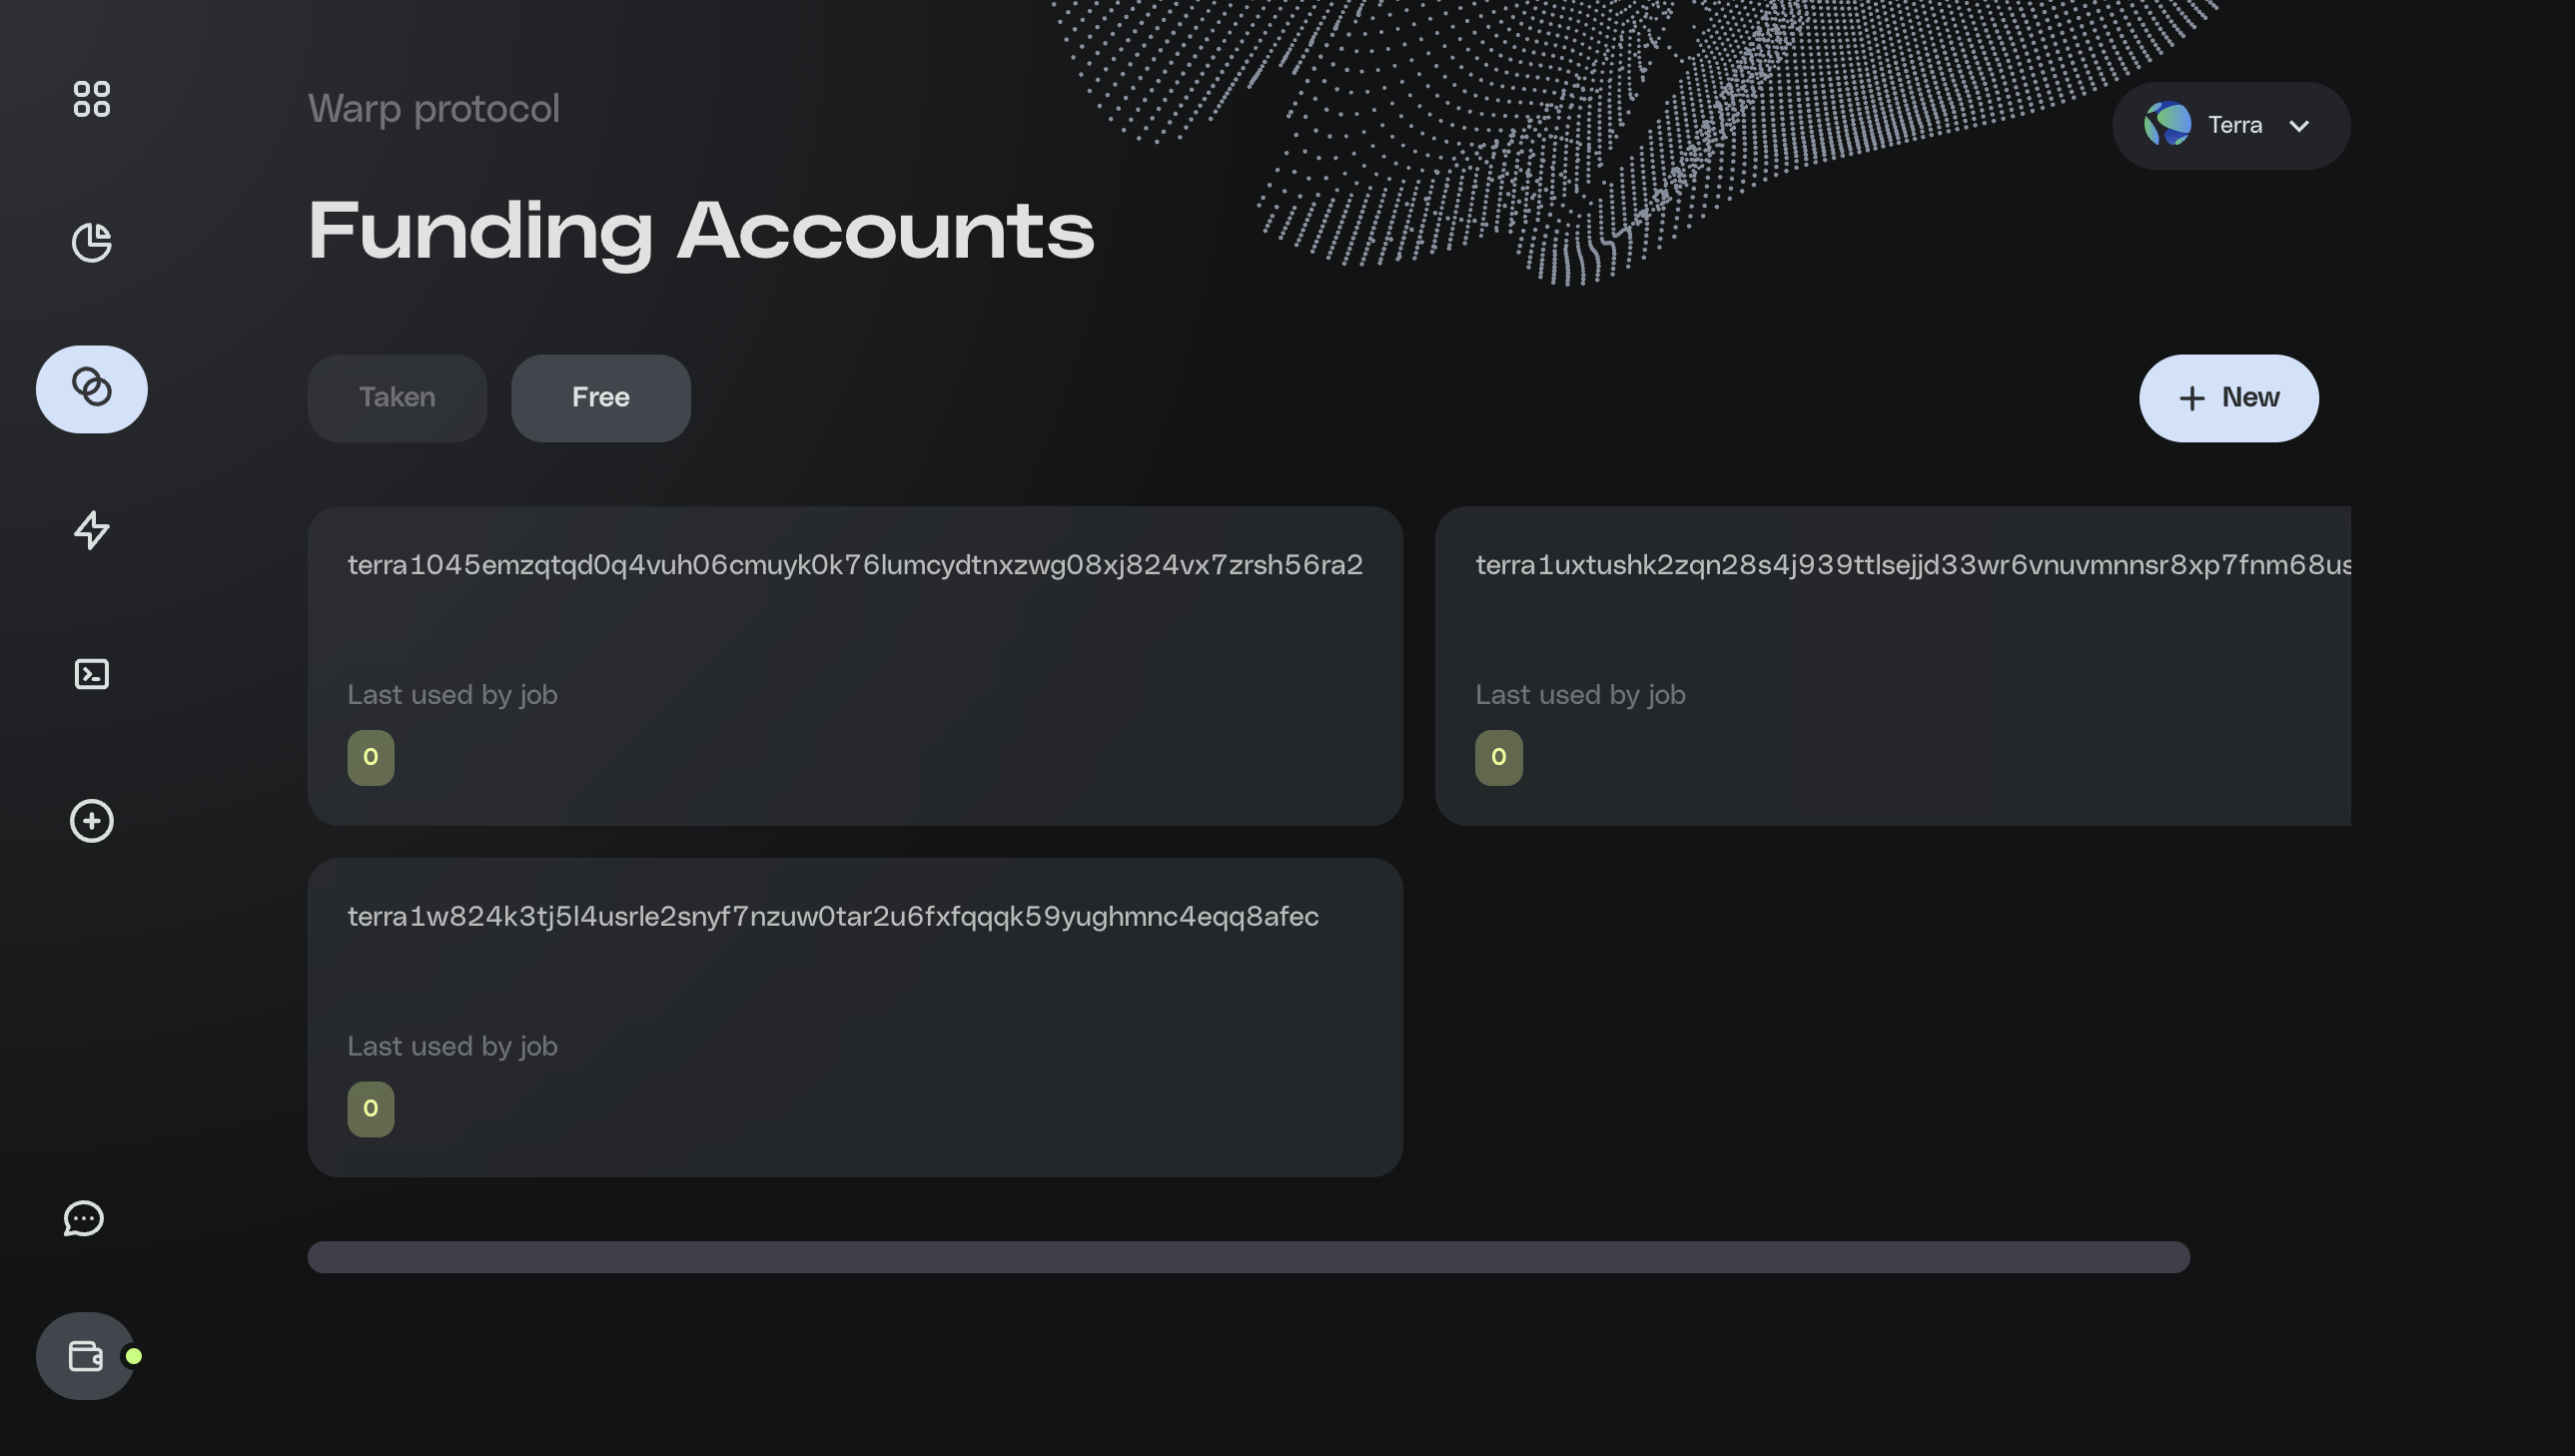
Before you can create a recurring job with Warp, you need to create a fuding account to pay for job fees and rewards. Click the interlocked circled in the menu on the right to create a funding account by signing a transaction. If you are on the Terra blockchain, make sure you have some Luna in your wallet to pay for gas fees. You can get testnet Luna from Terra’s testnet faucet.

-
Click New and sign the account creation transaction in your Station extension to create a new account.
-
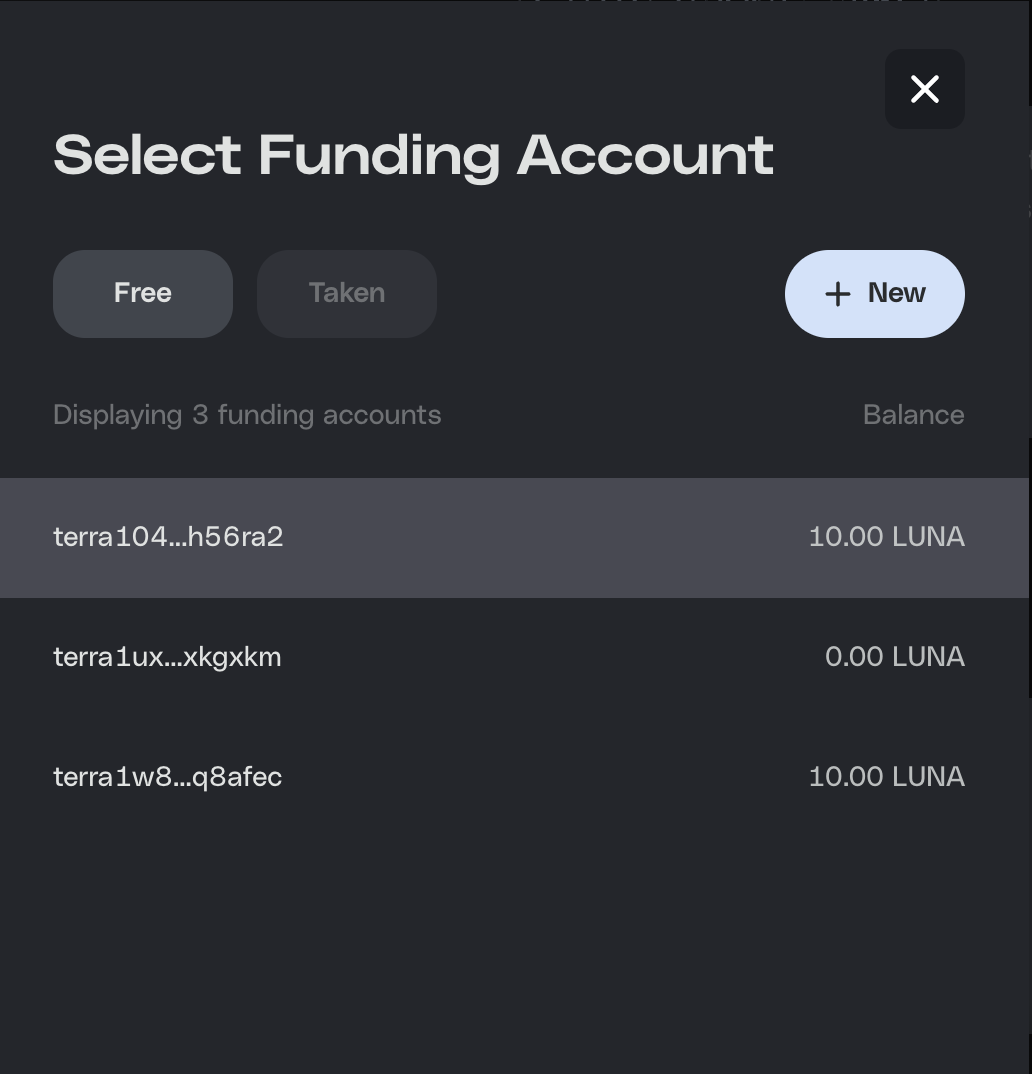
Click the Free tab to view your new account and then click on your account.
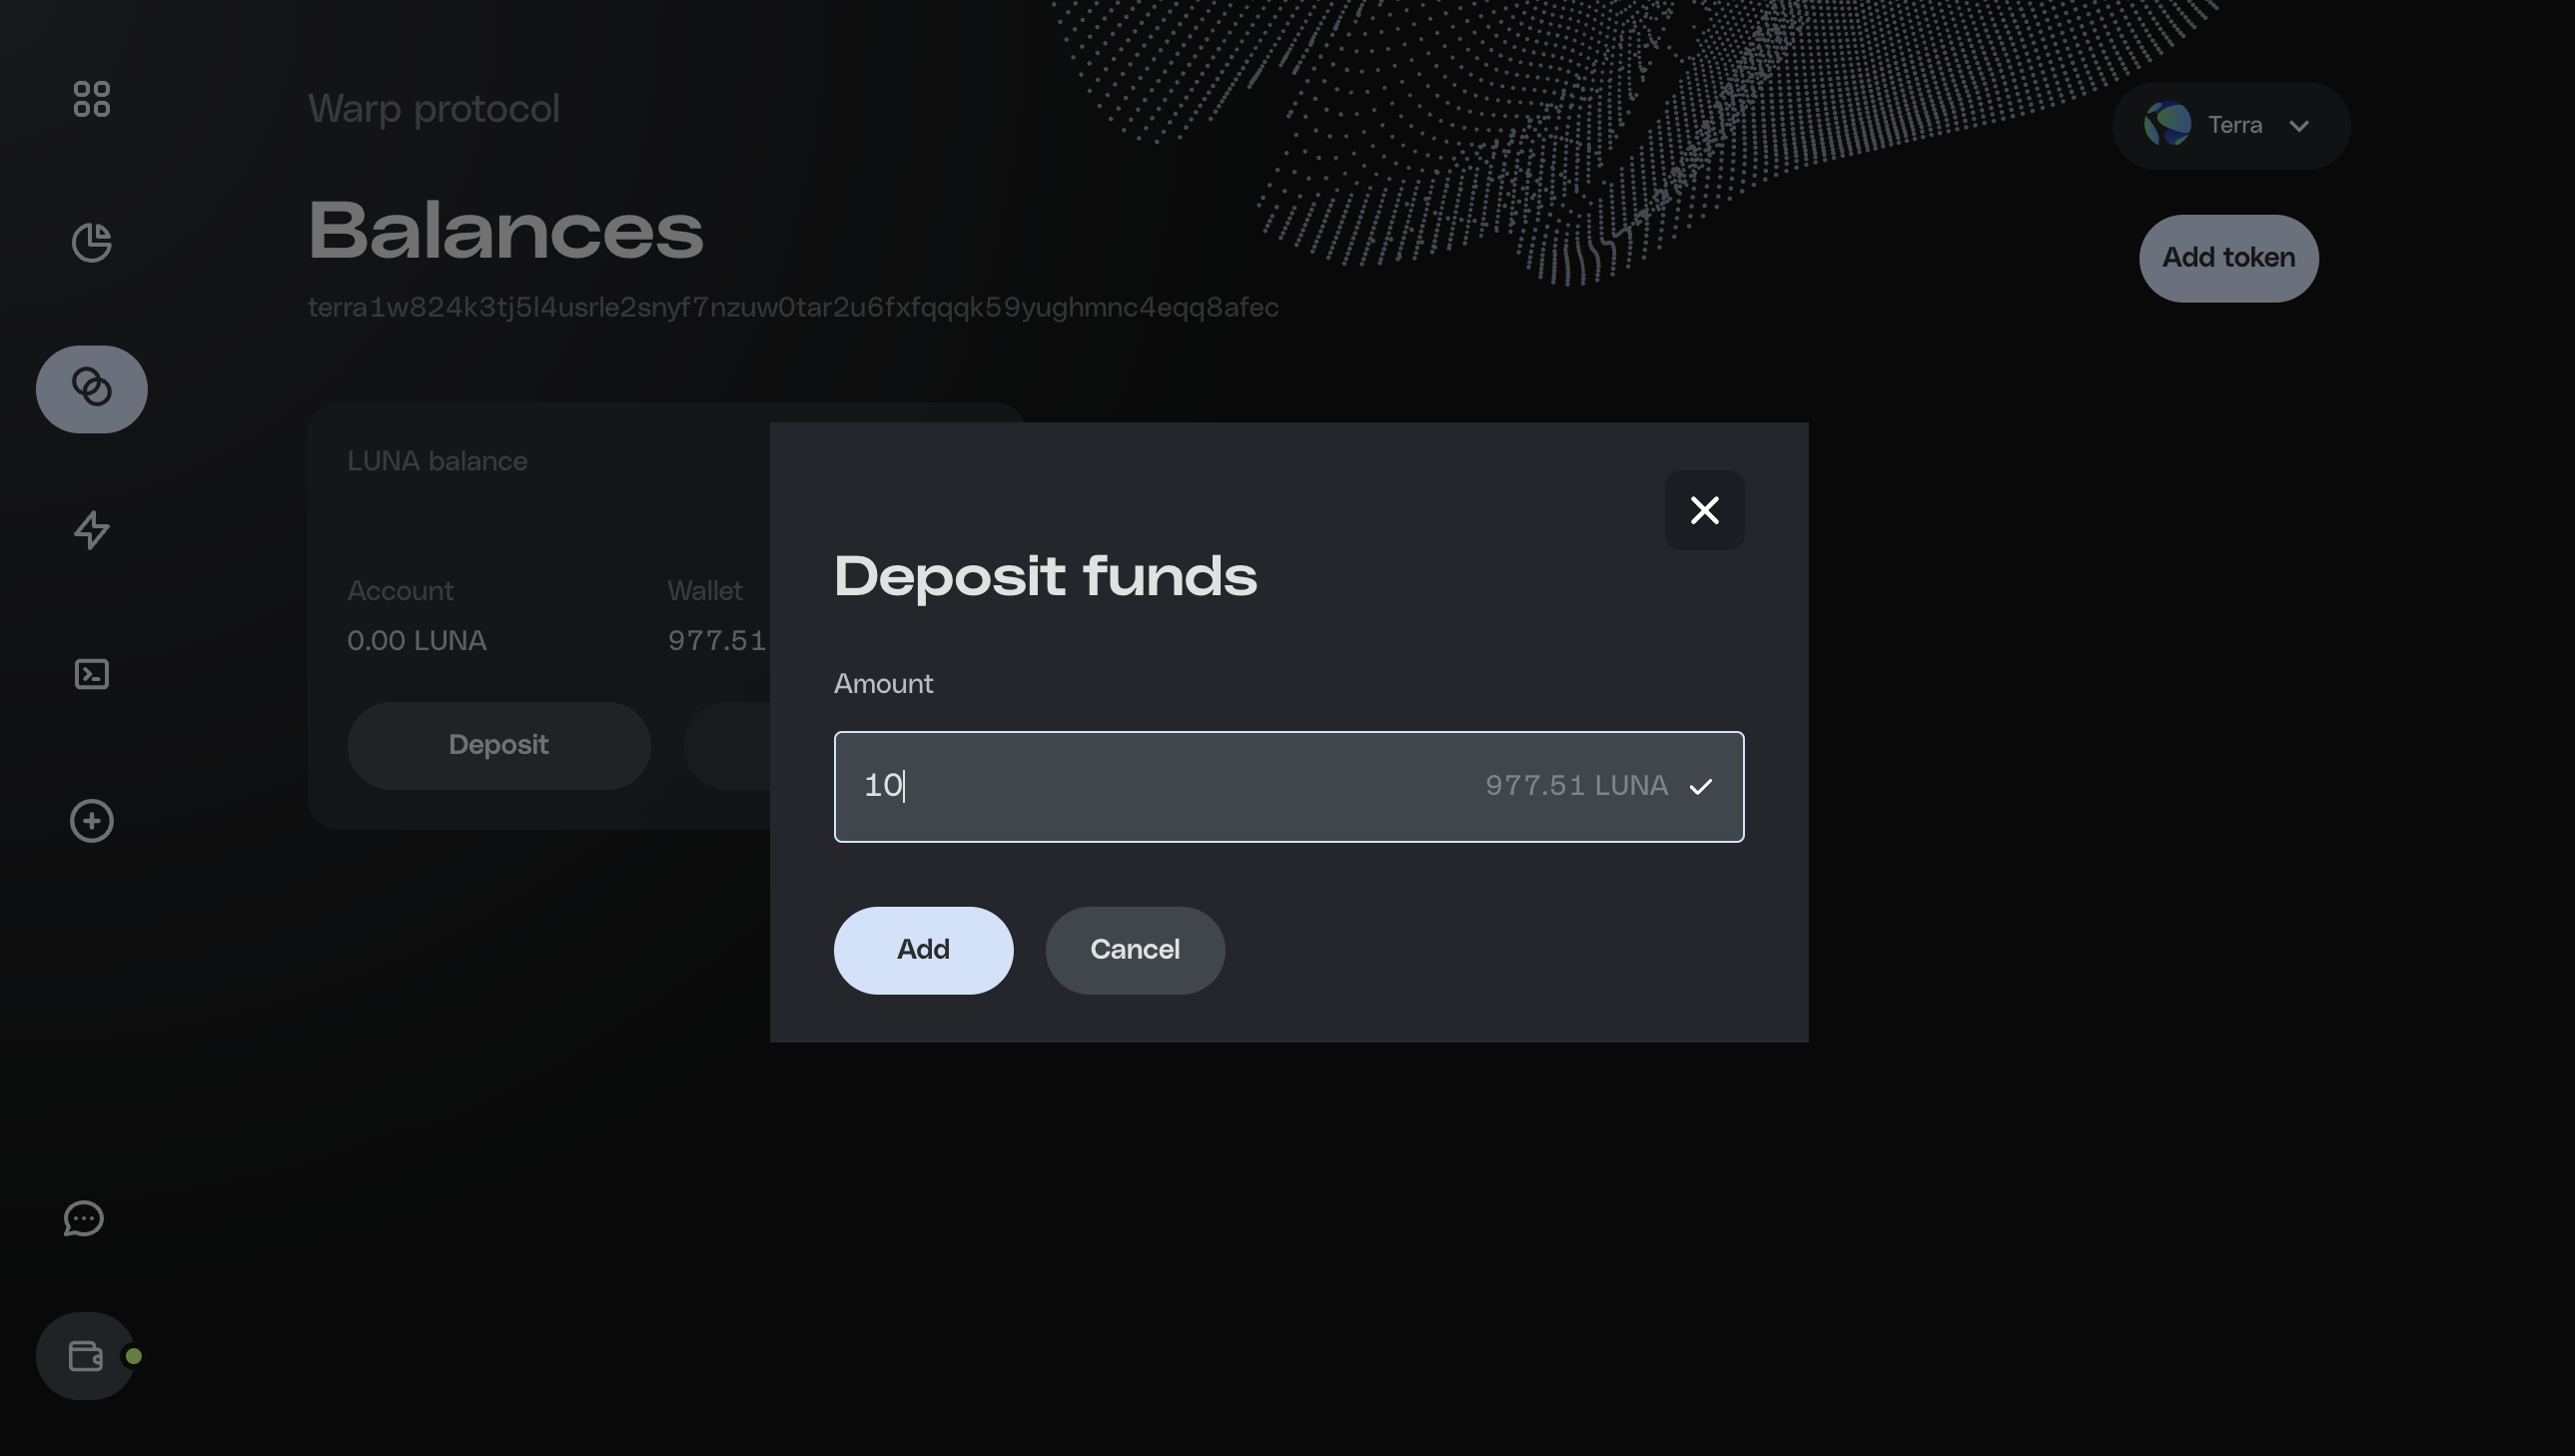
- Click Deposit to add funds to the account. These will be used to fund the job. You can also withdraw from your account.
-
Enter an amount and click Add.
-
Sign the transaction in the Station Extension.
Create a Job
In this tutorial, you’ll learn how to create a job that harvests rewards for the Eris protocol every day. The basic logic of the job can be stated as follows:
If the current time is greater than the next execution time, execute the harvest message.
This job is set as recurring, meaning that it will be requeued after execution.
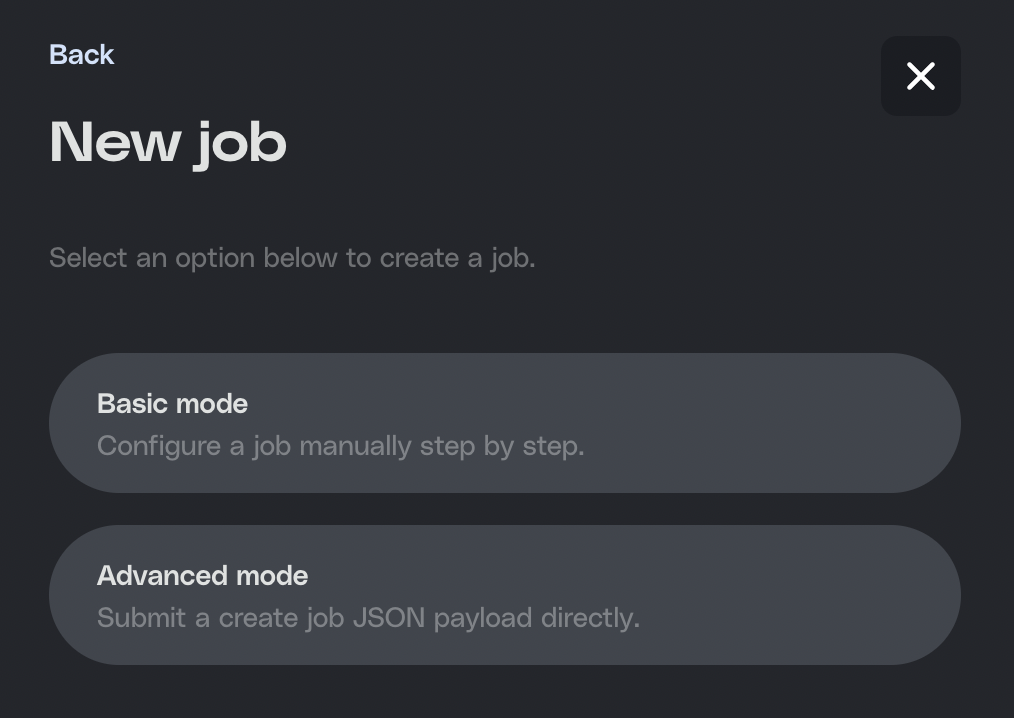
- Click on the plus symbol (+) in the menu on the left and then click Basic mode to create a Job manually.
-
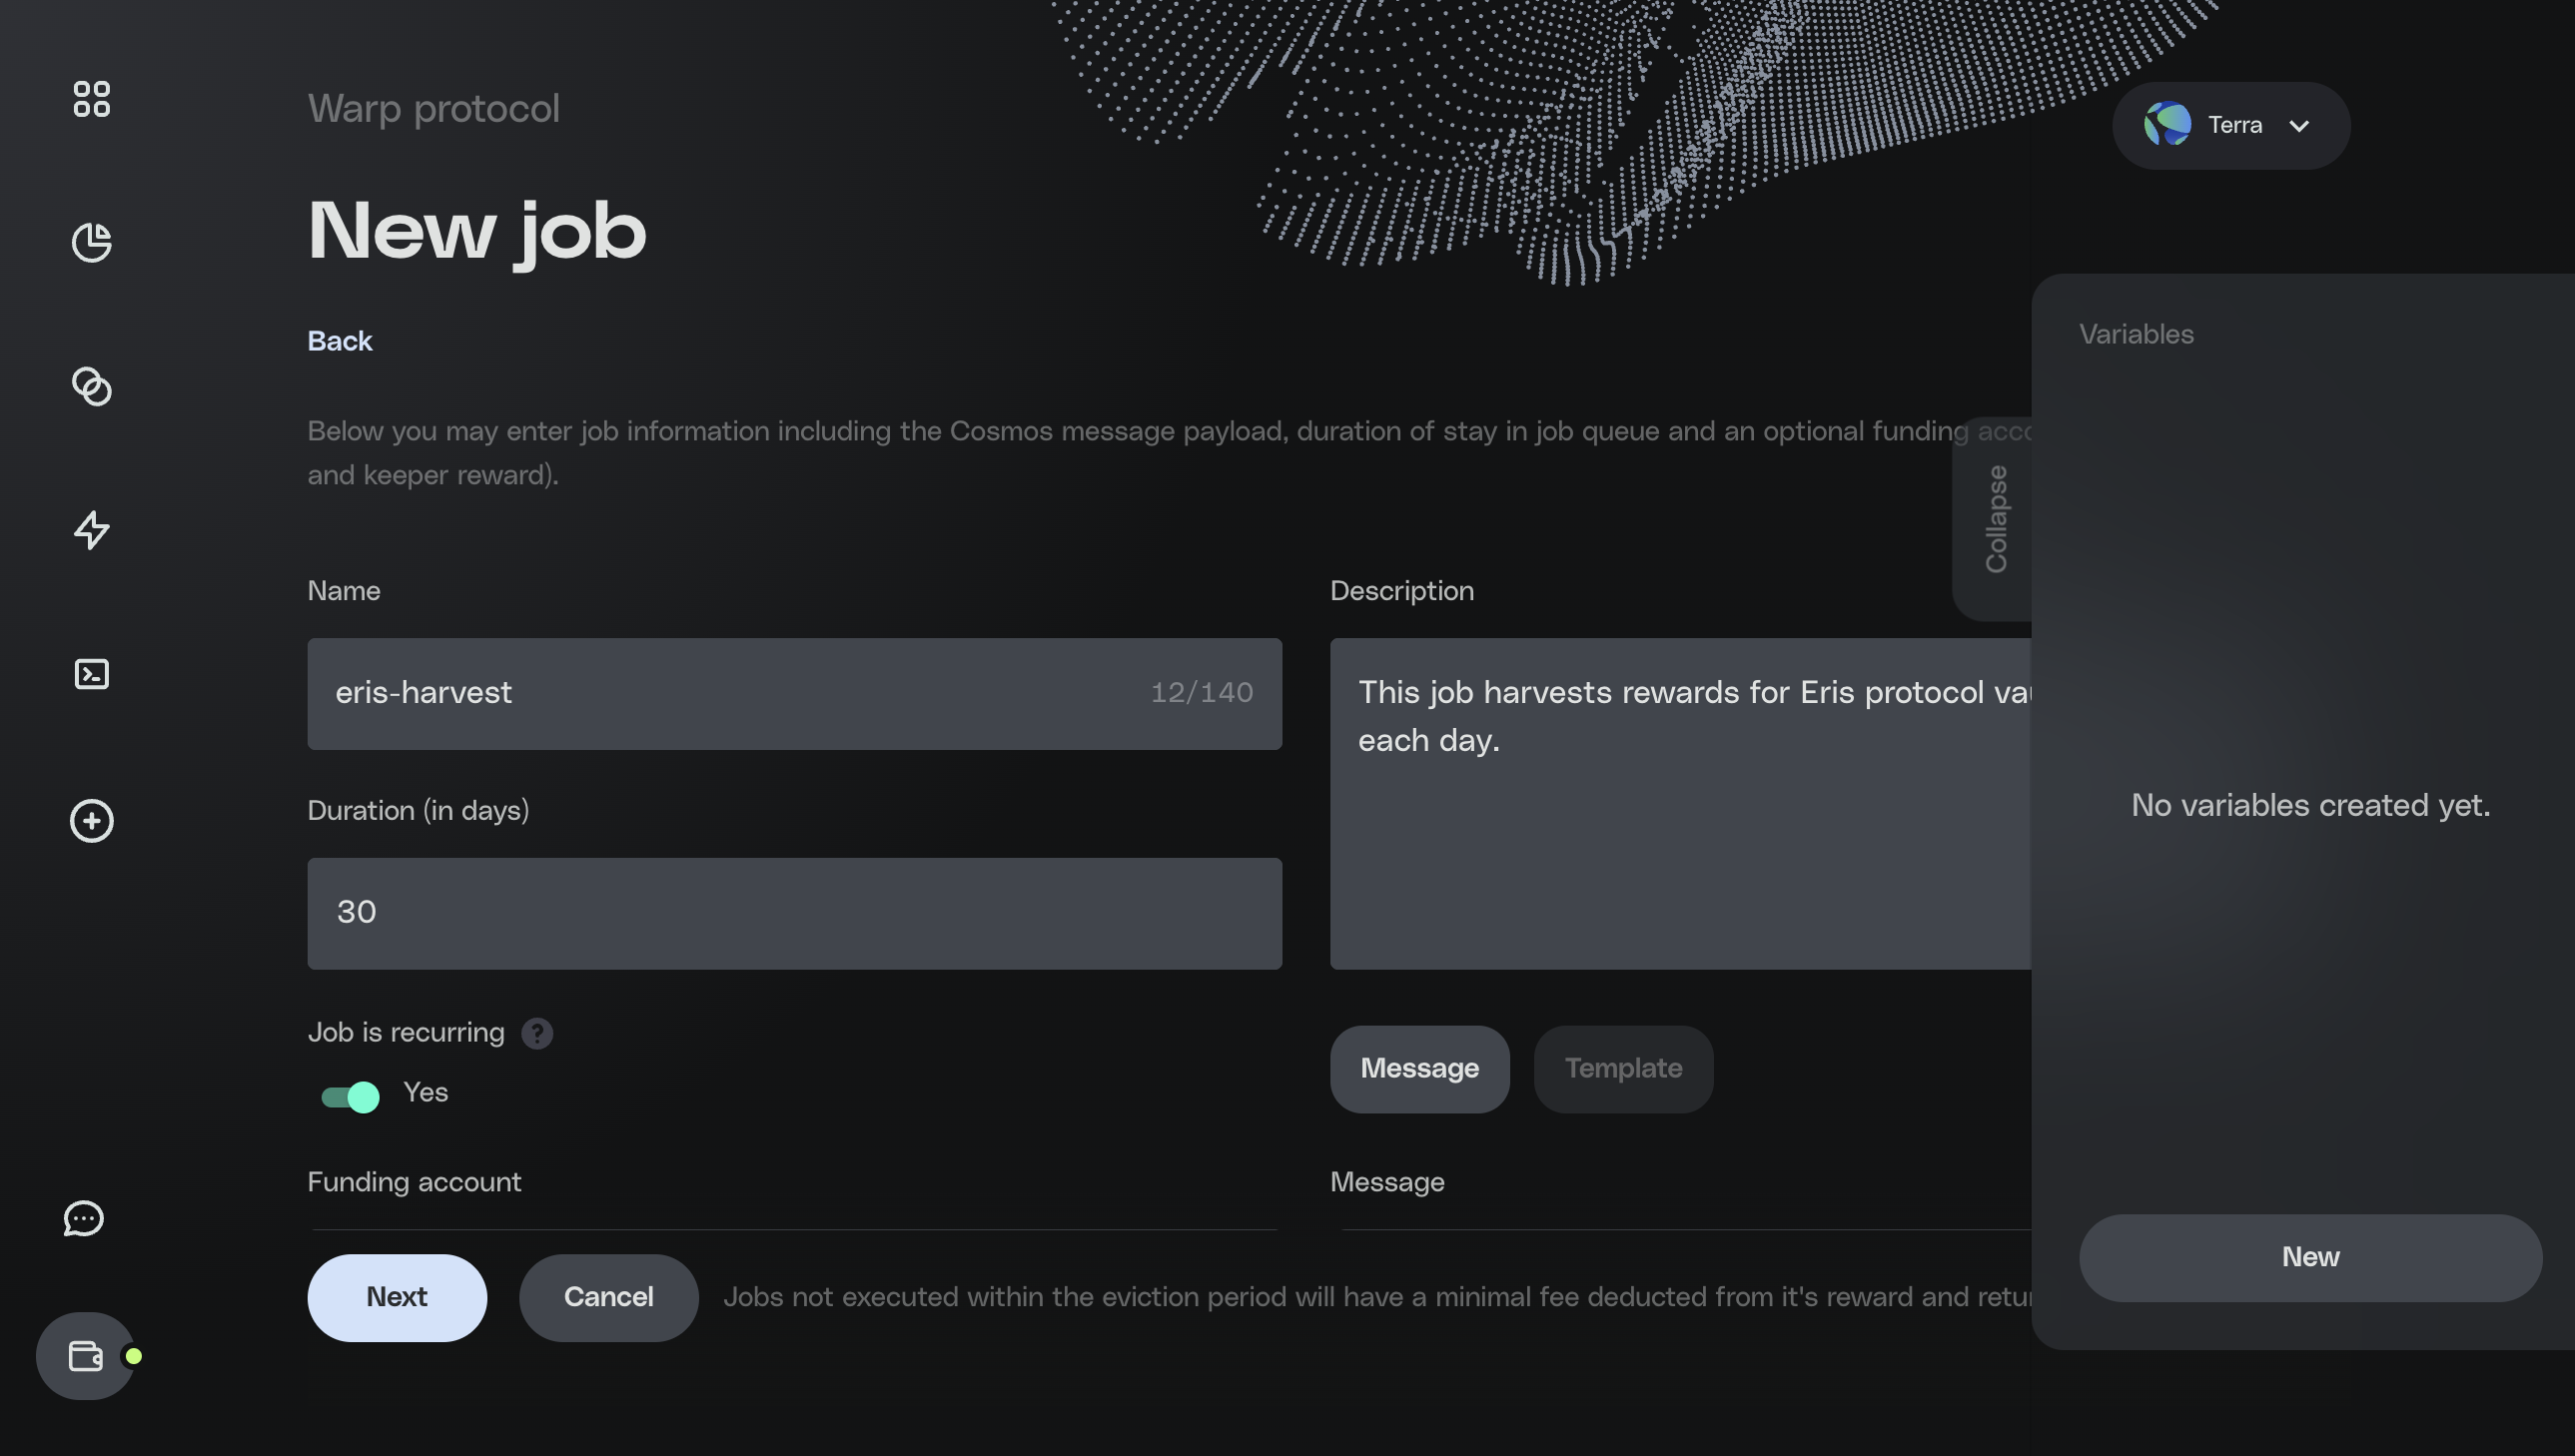
On the Job creation screen, enter a name for your job.
-
Input the following information into the Job creation fields:
- Name:
eris-harvest - Description:
This job harvests rewards for eris protocol vaults each day. - Duration:
30(in days)
- Name:
-
Click the Message button located under the reward field.
In the message field, paste the following message that tells the Eris contract to harvest rewards.
When using a Wasm message in the UI, the message contained in the msg field must be base64 encoded.
- Specify the job as recurring by inputting the number of days you want the job to run for and setting the Job is recurring toggle to yes. Recurring jobs are automatically requeued after execution.
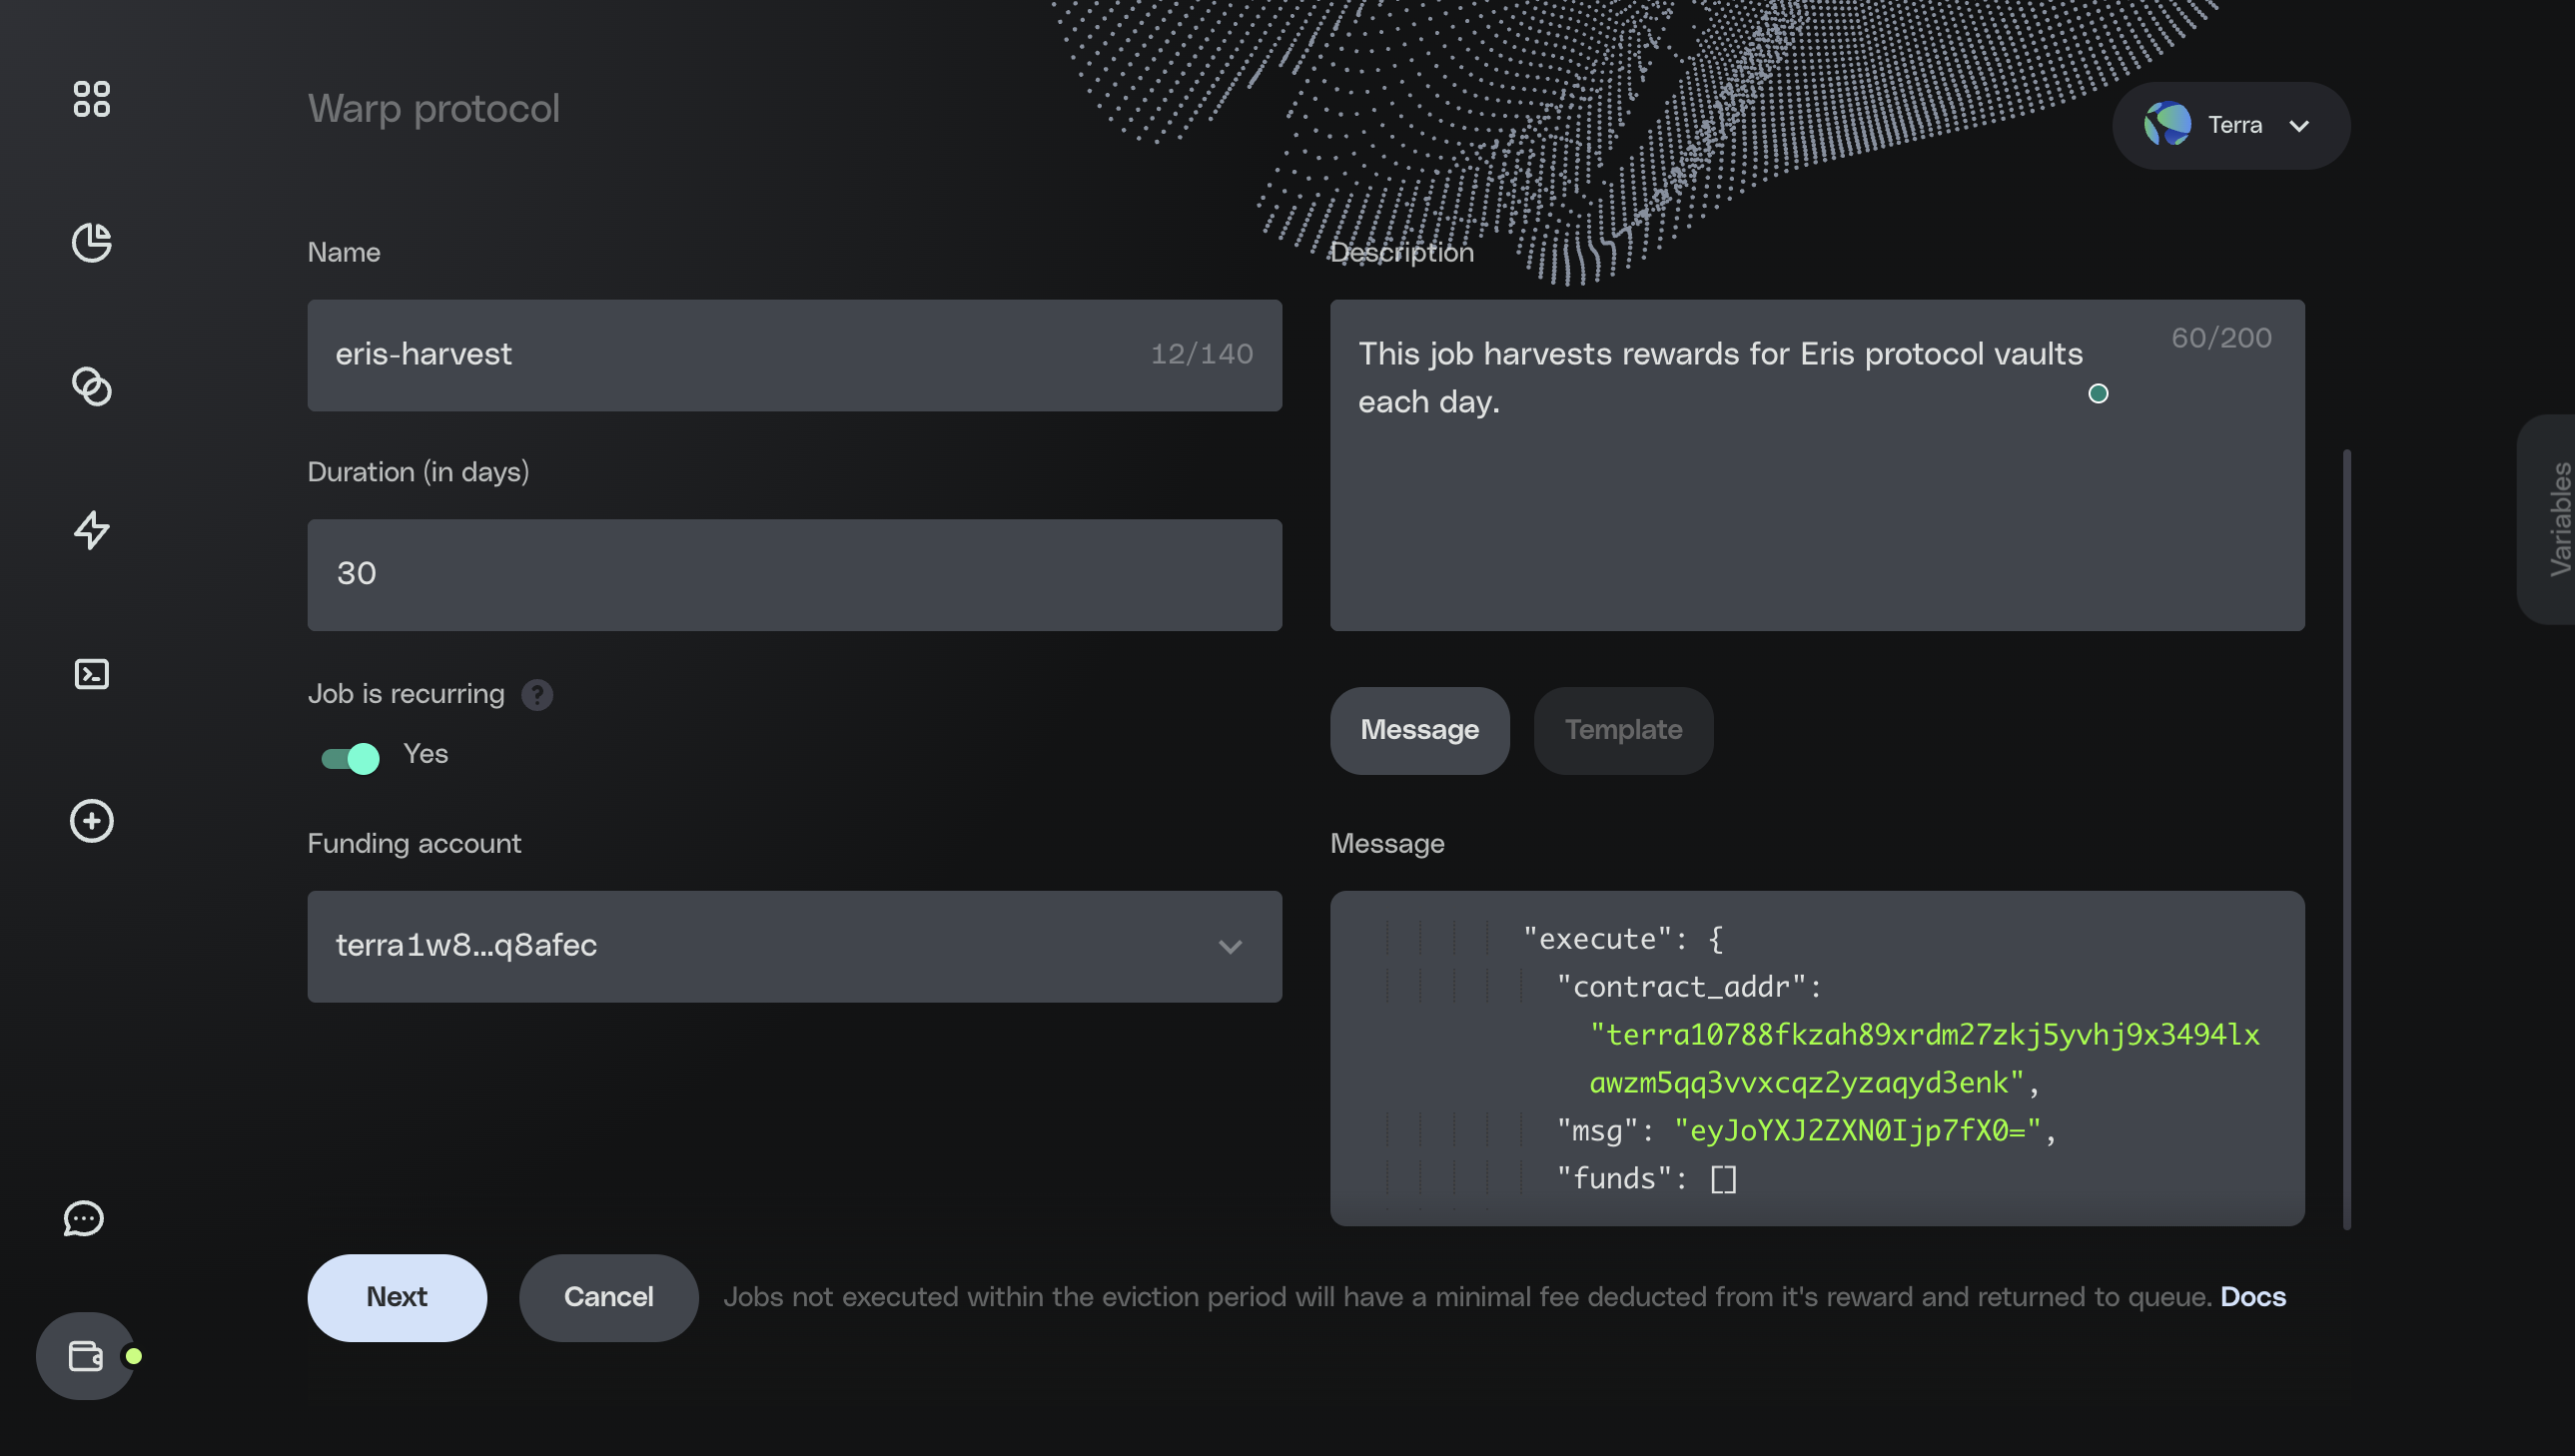
- In the Select funding account section, click on the account you created and funded earlier. This account will fund the recurring job and pay for fees and job rewards.
- Click Next.
Add a variable
- Because this job needs to be run every day, it requires a variable. Every time the job is run successfully, the execution time variable will be incremented by one day. Just like in other programming languages, you can provide variables in Warp that can be updated.
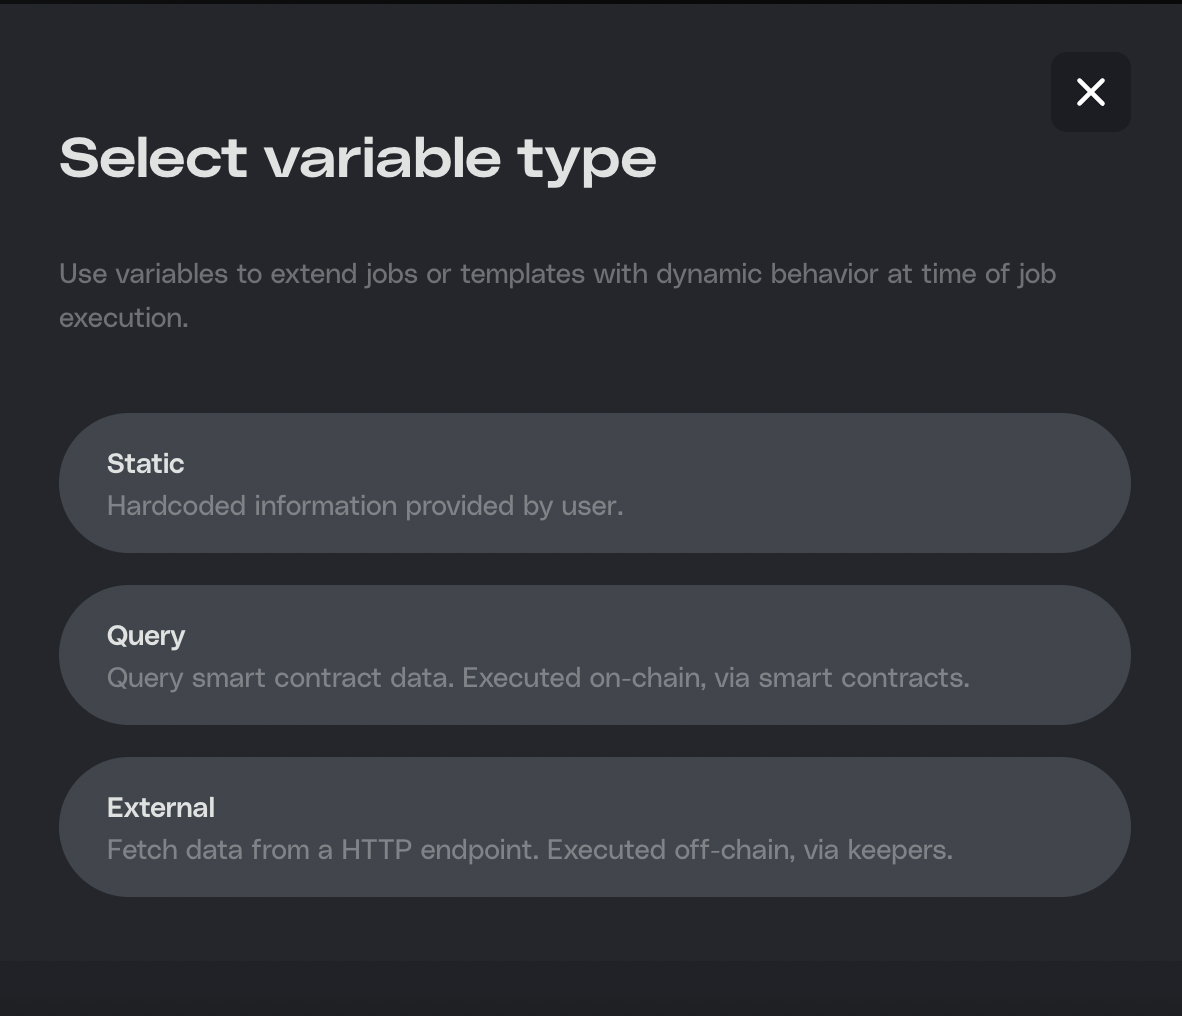
Click the Variables tab on the right side of the screen and then click New.
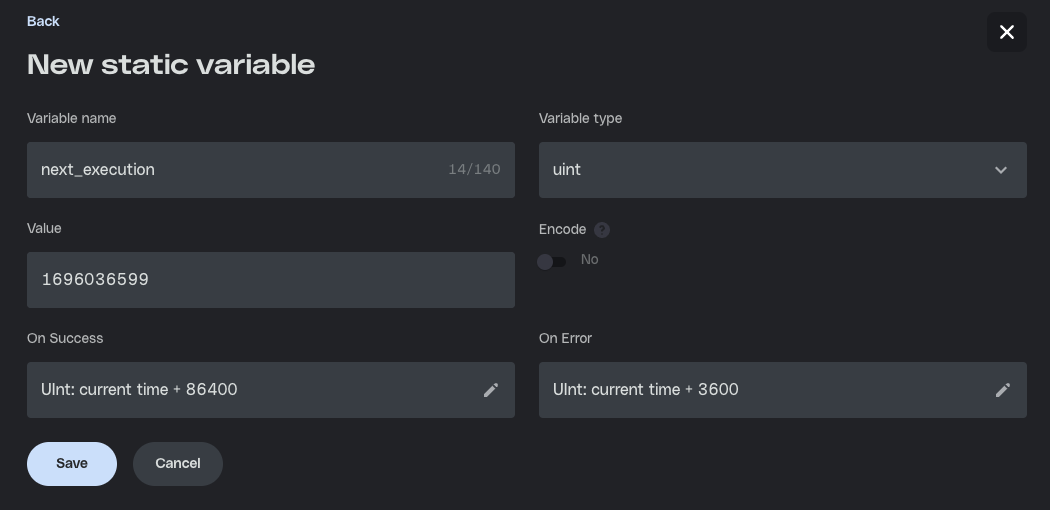
- For the variable type, click Static. This variable is static because it needs to be an updatable value. The other two types of variables are query and external, which aren't needed for this job.
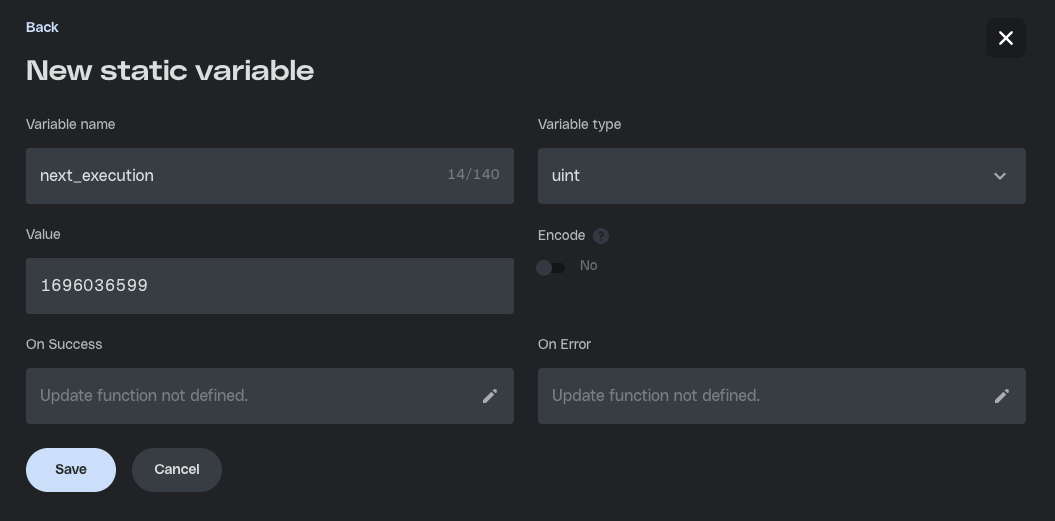
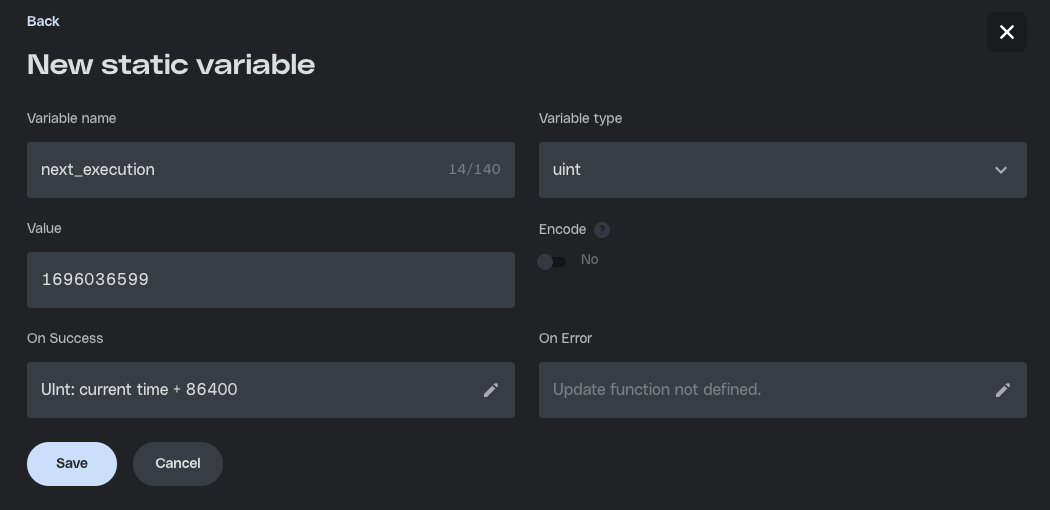
- This variable will be called
next_execution. The value type will beuint, and the value will be a date in UNIX format. You can visit https://www.unixtimestamp.com/ for information on UNIX timestamps. For example, the UNIX timestamp for Sat Sep 30 2023 01:16:39 GMT+0000 is1696036599. This value represents the next execution time for the harvest message.
-
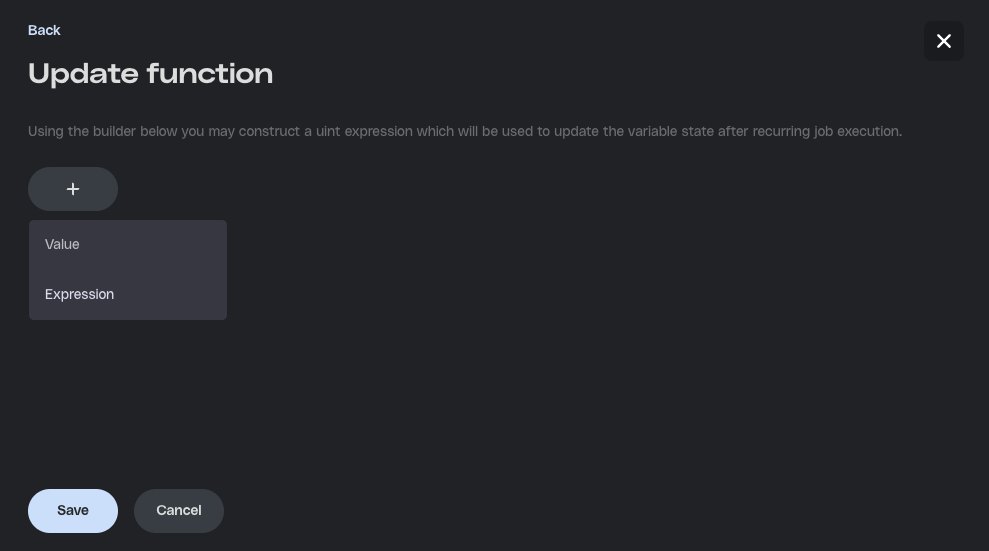
Because the harvest message must be updated every 24 hours, an update function needs to be used. Click the edit symbol in the On Success field to open the update function editor.
-
Click the plus (+) symbol and click Expression to add an update expression.
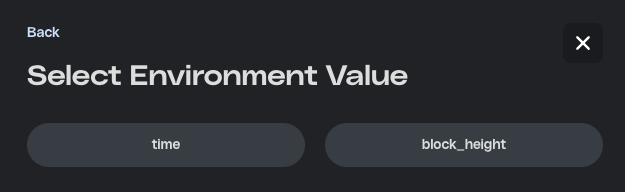
- On the left side of the expression, click the puzzle piece symbol and select
Environment.
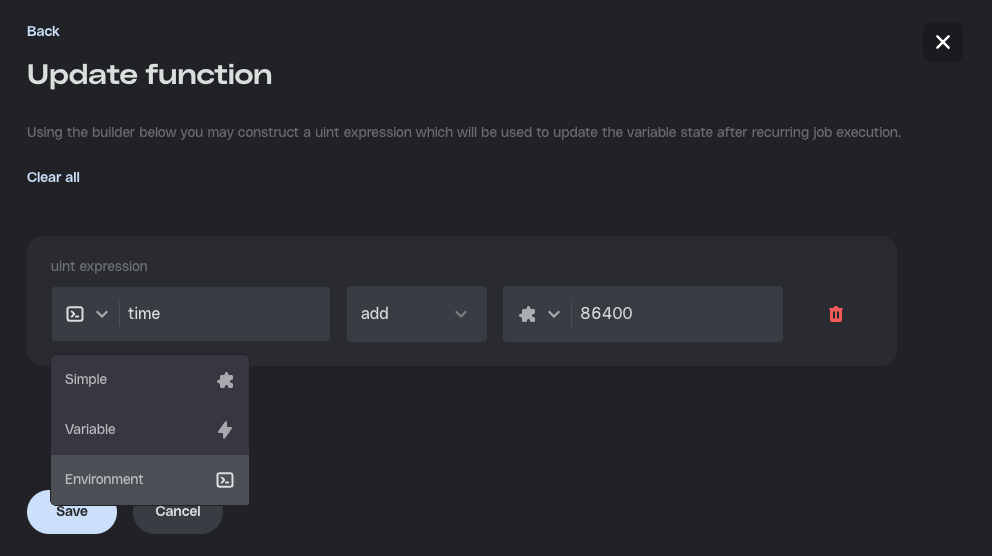
- Click time to select the time environment variable. On the right side of your expression, input
86400, which is the UNIX code for 24 hours.
- Click Save.
- On the variable page, your update function will show. It explains that on each successful job execution, the value for the
next_executionvariable will be updated to the current time plus 24 hours (86400).
-
Follow the same steps for the On Error field. Like before, the left side will be the time environment value. This time, input
3600on the right side of the expression. This expression adds one hour to the current time every time the job message is triggered but fails. -
Click Save to return to the New Job page. Then click Next to move to the Condition page.
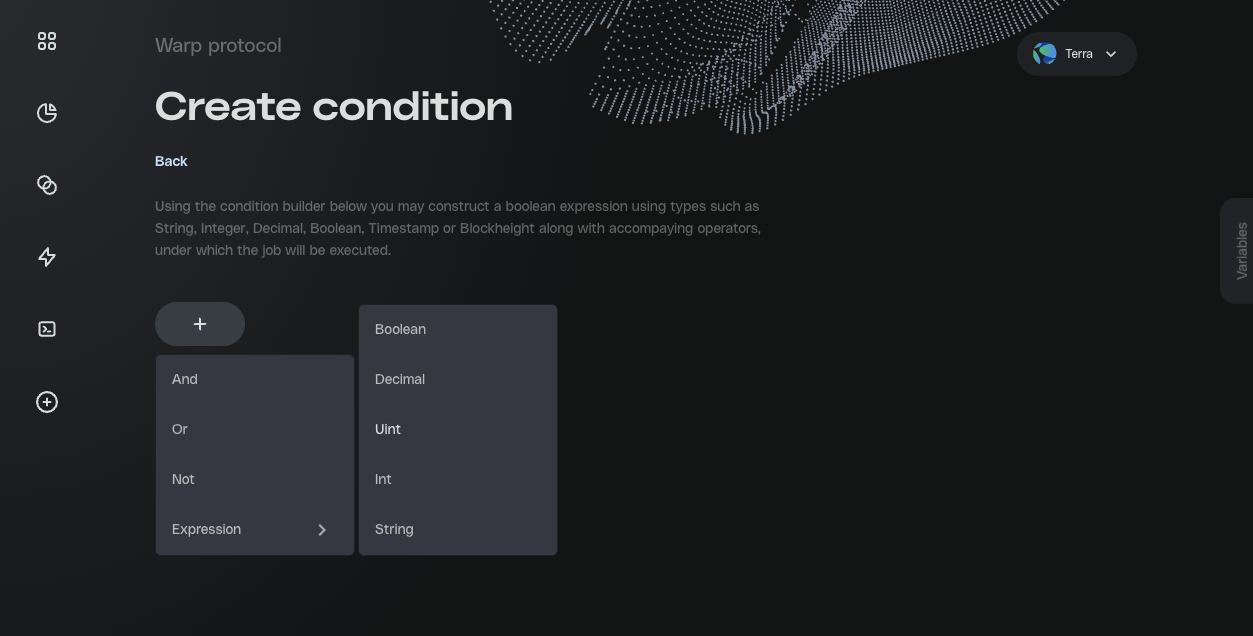
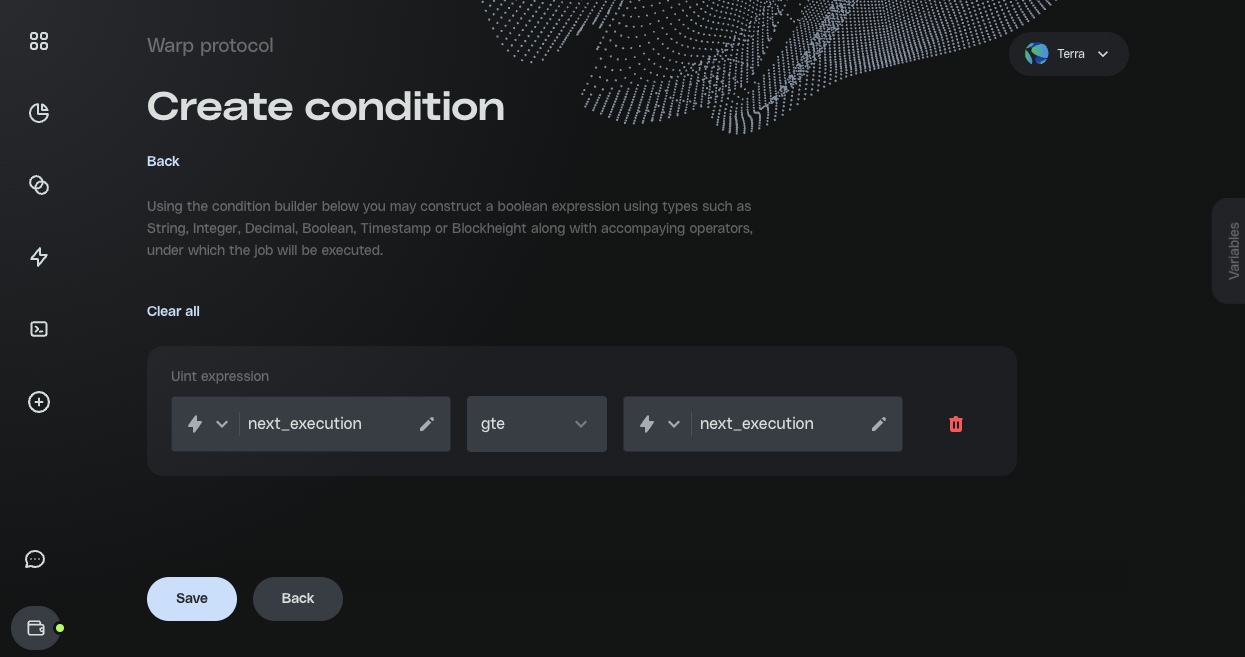
Create the Condition
- On the Condition page, click the plus (+) symbol to add a condition. Select Expression, then select Uint.
-
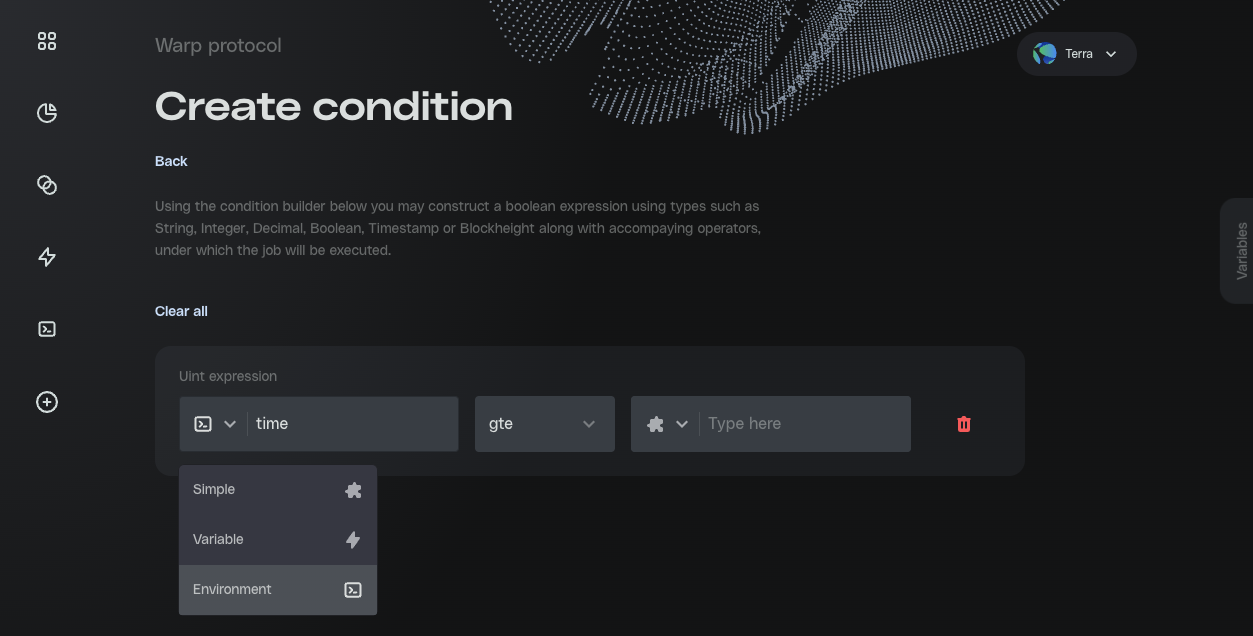
The condition for this job is simple: if the current time is greater than or equal to the value of the
next_executionvariable, execute the job message. -
To fill out the left side of the condition, click the puzzle piece symbol and select Environment, then select time. This sets the left side of the expression to the current time value.
-
In the middle of the expression, select gte, which means “greater than or equal to.”
-
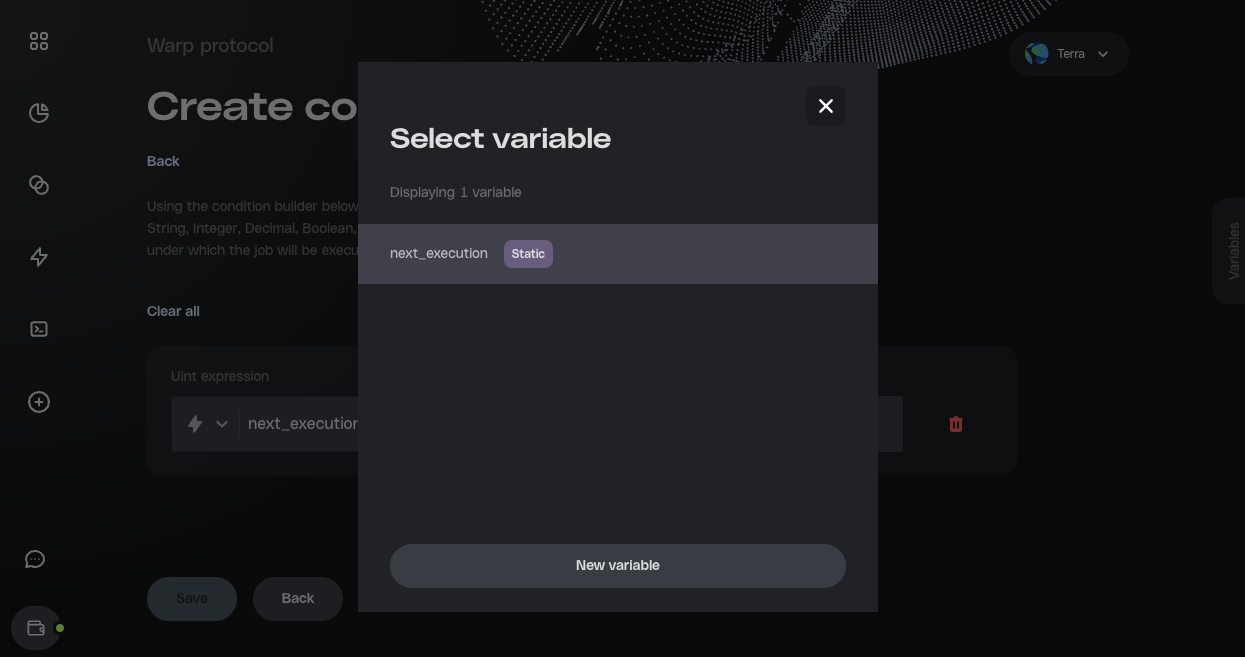
On the right side of the expression, click the puzzle piece symbol and select Variable, then select the next_execution variable created earlier.
- The finished condition reads as follows: if the current time is greater than the value of the
next_executionvariable, execute the job message.
-
Click Save to finalize your condition.
-
Review your job and be sure to look over the reward ad fee amounts that were estimated. Click Save to submit the Job. Then, sign the transaction in your Station extension.